How to Repair the Logic Board of Your MacBook
For Mac users, the logic board is the heart of the system, often compared to the motherboard in traditional PCs. It houses key components such as the processor, memory, and various ports that enable your Mac to connect with other devices. When the logic board experiences issues, it can significantly affect the performance of your MacBook. In this blog, we’ll walk you through how to repair the logic board on your MacBook and troubleshoot common problems associated with it.
How to Repair the Logic Board of a MacBook
Repairing a MacBook’s logic board might seem daunting, but it’s a manageable task if approached carefully. Logic board failure is more common in older models, so if you’re working with an older MacBook, there’s a chance you might face some issues. Before starting, here’s what you’ll need:
-
An oven (yes, you’ll be using it!)
-
Thermal compound
-
6” screwdriver
-
Small screwdriver
-
Aluminum foil
Step-by-Step Guide to Repairing the Logic Board
-
Unpack the MacBook and Open the Case
Begin by using both the 6” and small screwdrivers to carefully remove the top case of your MacBook. This will give you access to the internal components. -
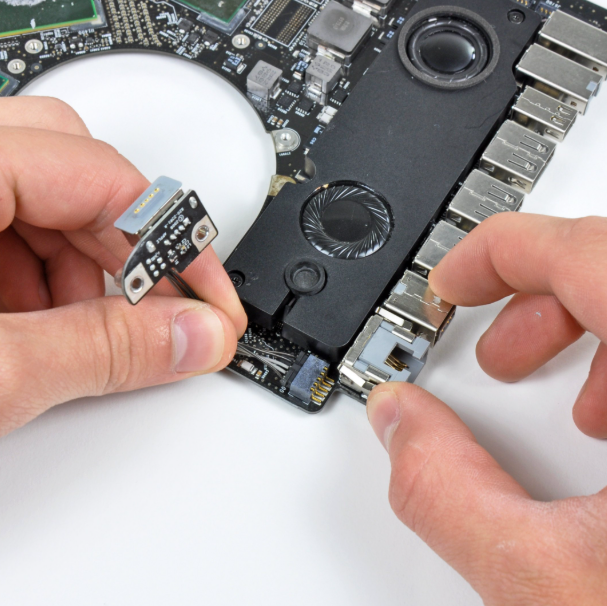
Remove the Logic Board
Once the case is off, use the screwdrivers to carefully detach the logic board from the MacBook. You’ll also need to remove the thermal compound applied to the board. -
Clean the Logic Board
Gently clean the logic board to remove any dust or debris that might have accumulated over time. Make sure it’s spotless before moving on to the next step. -
Prepare the Logic Board for Reflow
Wrap the logic board in aluminum foil to protect it from direct heat. This will help prevent any damage during the reflow process. -
Reflow the Logic Board
Preheat your oven to 220°C (or 320°F) with air circulation. Place the wrapped logic board inside the oven and let it heat for about 7 minutes. This process helps to reflow the solder joints on the logic board and can help fix certain issues like poor connections. -
Remove the Logic Board from the Oven
After the 7 minutes are up, turn off the oven and carefully remove the logic board. Let it cool for a few minutes before continuing. -
Apply New Thermal Compound
Once the board has cooled down, apply new thermal compound to the areas where it was previously removed. This will help with the cooling process once the logic board is reinstalled. -
Reinstall the Logic Board
After applying the thermal compound, carefully reinstall the logic board back into the MacBook. Make sure all connections are secure. -
Close the Case
Once the logic board is back in place, close the MacBook case and secure it with the screws you removed earlier. -
Test the MacBook
After the MacBook is fully assembled, turn it on and check if everything is functioning correctly. If the logic board repair was successful, your MacBook should boot up and work normally.
Common Causes of Logic Board Failure
While a logic board typically lasts a long time, there are several factors that can cause it to fail. Common causes include:
-
Physical damage: Dropping your MacBook or exposing it to physical shocks can cause damage to the logic board.
-
Overheating: Excessive heat can cause the solder joints on the logic board to weaken and eventually fail.
-
Electrical issues: Power surges or faulty power connections can damage the logic board.
-
Wear and tear: Over time, components on the logic board may degrade or fail due to age or heavy use.
Common Signs of a Bad Logic Board
If your MacBook exhibits any of the following issues, the logic board might be the culprit:
-
Battery Charging Problems
If your MacBook isn’t charging or isn’t recognizing the battery, it could indicate a logic board failure. Try cleaning the charging port and testing the charging cable, but if the issue persists, the logic board might need repair or replacement. -
Non-recognition of Battery
Sometimes, a MacBook might not recognize the battery at all. This could be related to the logic board or motherboard. If the battery isn’t being detected, try troubleshooting with a technician. -
Random Crashes
Unexpected crashes or system freezes can often be traced back to a malfunctioning logic board. If your MacBook crashes randomly, following the repair steps could help restore functionality. -
No Display Output
If your MacBook turns on but the screen remains blank, the issue could be with the display or the logic board. While the display might be faulty, it’s also possible that the logic board is not sending the proper signals to the screen. -
Faulty USB Ports
If the USB ports aren’t working correctly, or your MacBook doesn’t recognize external devices, the problem might be with the logic board. Start by cleaning the ports and testing the USB devices on other computers. If they work, but your MacBook still has issues, the logic board may need attention.
Conclusion
Repairing the logic board of a MacBook isn’t a task for the faint of heart, but it’s something you can tackle with the right tools and patience. If you find that your MacBook is experiencing any of the issues mentioned above, performing a logic board repair might resolve the problem. However, if you’re not comfortable doing it yourself or if the repair doesn’t work, it’s best to seek professional help from a technician who can diagnose the problem accurately.
If your MacBook’s logic board is beyond repair, replacing it may be the only option. Make sure to check your warranty before attempting any repairs, and if necessary, consult with an expert to avoid further complications.